It seems everyone has a list of new handguns they’d like, and most of them are semi-auto. The market is flooded with images of the latest offerings from Kimber, Springfield and Glock.
Revolvers have seemingly been sidelined as “old school.” As such, more and more revolvers are being traded in for the latest and greatest semi-autos. There are some excellent revolvers out there, and it’s important to know how to quickly and effectively evaluate them to ensure they’re in serviceable condition.
It’s surprising how easy it is to pick out a good, used revolver as opposed to a semi-auto pistol. In fact, most of what you need to know to evaluate a revolver coming in on trade can be discovered through a simple visual inspection and a few function checks. Semi-autos, on the other hand, need to be fired to know how well they’ll function.
The first step in checking over a revolver is instinctive: a good visual inspection. Is the finish of the gun in great shape? If it is a blued gun, is it a deep, reflecting surface, or does it show signs of wear? It’s usual for the edges of a blued gun to have some holster wear. The finish may be dulled or partially rubbed off, but that only affects how pretty it is and not how well it will function.

Some wear is likely. What’s not expected is rust, pitting, dings, dents or deep scratches. These can indicate that the weapon was dropped, mishandled or abused by its previous owner, indicating that it might be one to skip over. Blued guns, however, have an advantage in that it’s possible to re-blue them if the finish is the only issue. Other options may include a spray-on coating. Stainless guns are perhaps a little easier because it’s usually possible to buff out minor imperfections without going through a refinish. Plated guns with finish issues would have to be replated.
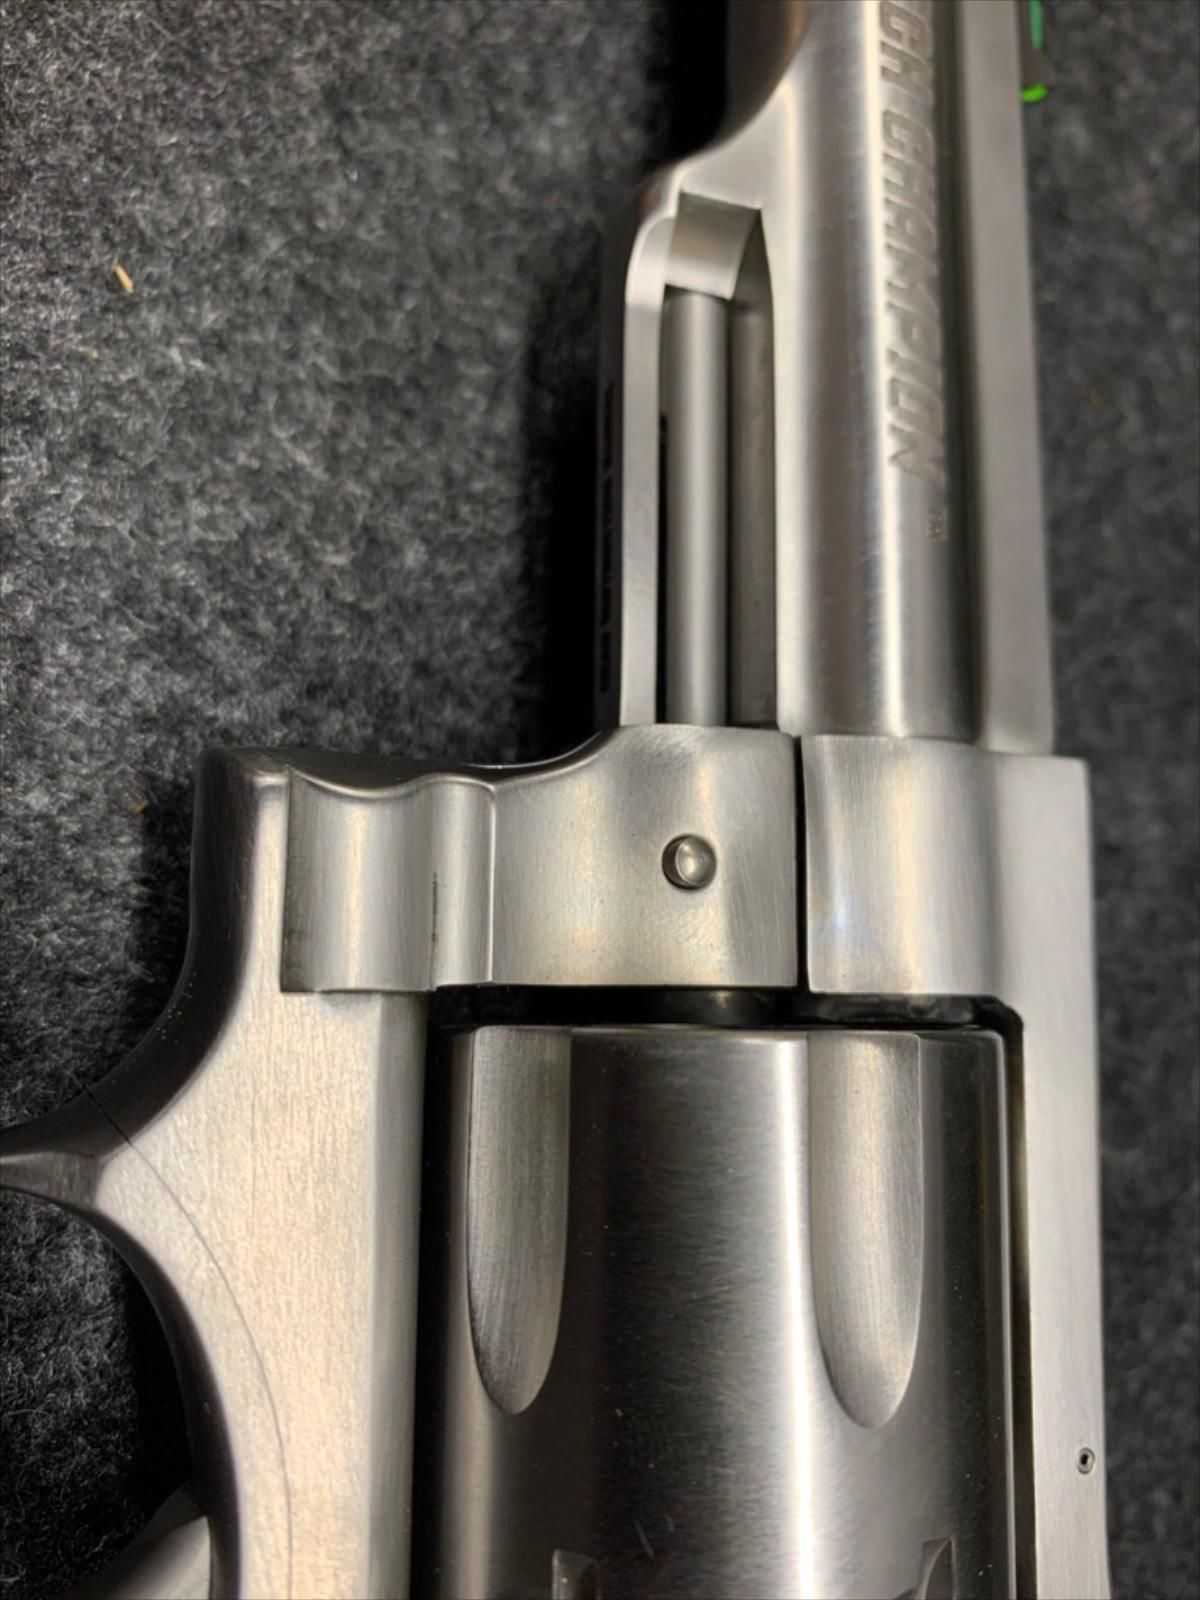
Beyond the finish, does the gun show any signs of tampering? The grips should be in good shape and tight. The side plate, if present, should fit flush and seamlessly into the frame with no gaps or warping. Damage here likely means that someone other than a trained gunsmith has been operating on it. Be wary. It’s easy for an untrained person to do significant damage, making the gun unsafe. There might be nothing wrong inside, but is it worth the risk? Replacing the internals can get expensive. It’s ok if the screws are a little messed up. That happens, and they are quickly and cheaply replaced.
Is the barrel straight with no signs of deformation? A bulge anywhere in the barrel is reason enough to decline the gun. When looking through the sights, does the front sight line up properly with the rear? Barrels are screwed onto the frame, so one that does not line up perfectly could indicate an issue. It could also mean a gun that has been dropped or otherwise abused. Look at the barrel where it fits the frame. It should show no gaps and should line up perfectly. Where the barrel protrudes from the cylinder is known as the forcing cone. Is it in good shape? It should show no signs of dings or uneven fit. The inside of the forcing cone should reveal no signs of unevenness and be free from buildup from lead or jacketed bullets. Looking at the muzzle end of the barrel, the rifling inside should have squared edges on each land (raised portion) of the rifling. The inside of the barrel should show no lead or jacket buildup and no signs of rust or deformities.
Move on to the trigger and hammer. Both should fit nicely in their respective opening and should be roughly centered side to side. The slots should be free from burs or other damage, and all edges should be straight and square. The hammers and triggers are usually in good shape as long as the gun hasn’t been dropped. For guns where the firing pin is mounted to the hammer, it should be free from burrs, be slightly rounded, and have no sharp edges where it strikes the primer.
Many later guns have frame-mounted firing pins. If that’s the case, the pin will be checked later in the process. Look at the firing pin hole in the back of the cylinder opening. It should be a clear, well-defined hole. The flat surface around it should show no signs of damage or abuse. Operate the action and hold it to the point where the firing pin is visible through the hole. It should protrude close to the thickness of a dime (roughly 0.030 inches).
Moving on to the cylinder, it should fit perfectly in the opening of the frame and have no deformities. There should be a small gap between the front of the cylinder and the forcing cone. Typically this ranges from 0.004 inches to 0.010 inches. A gap of 0.005 or 0.006 is ideal. The idea is for it to have a slight gap so that the cylinder can rotate freely without binding. I have had revolvers with as little as 0.002 inch of clearance, but such a small gap caused issues with lead buildup and powder residue after 50 to 100 rounds. Once cleaned, it functioned perfectly again. There should also be a space between the frame and the rear of the cylinder. This gap varies depending on the gun, the caliber of ammo that it shoots, and if it uses moon clips. Both gaps should remain consistent as the cylinder rotates and should not alter if the cylinder is pushed forward toward the barrel or pulled back toward the hammer. A slight movement (0.001-0.002 inches) is acceptable, but any more than that can indicate trouble.
The cylinder release should function easily. The yoke should open and close smoothly without binding. Once the cylinder is opened and swung out of the frame, it should rotate freely without any hitches or a feeling of graininess. The ejector rod in front of the cylinder should show no signs of wobble as the cylinder rotates, and it should show no marks or damage. When pushed to the rear, the ejector rod should again move smoothly and efficiently without binding. It should snap back briskly in place once the rod is released. The ejector at the rear of the cylinder and the rear face of the cylinder should have nice, sharp edges. Some cylinders may have a slight chamfer or beveled edge around the outer edge and each cylinder opening. These are normal and help with reloading as long as they are uniform. The small gear at the rear of the ejector should be in great shape with no variation on any of its teeth.
Now it is time to move on to the most critical parts of the inspection: the action or working mechanisms of the gun. No doubt you’ve dry-fired the gun by this point (or even before you started your inspection). The trigger should have been smooth throughout its pull. The older the firearm is, the smoother it will likely be since actions tend to polish themselves over time. There should be no binding, and the trigger should snap easily back to the front when pressure is removed.
Next, cock the hammer to the rear in single-action mode and then push forward, trying to make it fall. It should remain firmly in the cocked position. Any issue here would make the gun unsafe.
The last step is to check the cylinder timing. It’s another area that is critical for safety reasons. Work the action as if firing the gun and observe the cylinder closely. It should lock into place just before the gun fires. Once locked, the cylinder shouldn’t spin in either direction since it is supposed to be lined up with the barrel’s bore. Check each chamber of the cylinder for consistency.
If these steps don’t reveal any issues, you can be about 90% certain that the revolver will function properly and safely.