The most popular shotgun of all time is the Remington 870, although that status is in jeopardy — if not already surrendered — after 2020’s dramatic halt in production during bankruptcy proceedings. New owner RemArms is making them again, though, out of the same Ilion, New York, plant and employing many of the same craftsmen who helped build the legend.
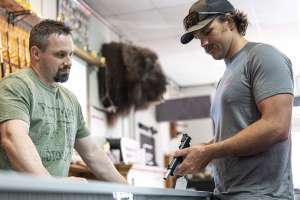
Regardless of the current champion, there’s no denying millions of 870s are out there. More than a few of your customers have at least one in their safe. The pump-action stops attacks with authority and is unfailingly reliable — virtues that make it ideal for home and self-defense.
Most models don’t wear the tactical enhancements that improve their performance in those duties, though. The addition of a lighted forend is a decided advantage on an 870, and installation is a breeze.
There are many aftermarket 870 forends available today, and hopefully you have a few with integral lights in stock. Keeping a small inventory is a wise investment, particularly if you offer this value-added service.
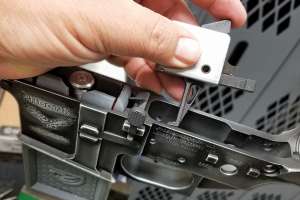
Once you’ve consulted with the customer and they have selected a lighted forend, as always, safety comes first and foremost. Keep the shotgun pointed in a safe direction, engage the safety — if it’s not already — and check that the tube magazine is empty. Then depress the bolt release, pull the forend back and ensure there is no shell in the chamber. Then double check.
Open the forend’s box and inventory parts. More than likely there’s only the lighted unit, but check anyway. Install the batteries and confirm it operates as designed. Now’s the time to discover a problem, not after the installation. Inspect for burrs, blemishes or debris, and clean if necessary.
870s with a magazine extension require removal of the clamp that anchors it to the barrel and ensures the parallel posture for reliable feeding. Simply loosen the bolt and carefully slide the unit toward the muzzle and off the gun. Do so with care to avoid scratching the metal’s finish — and maintain that diligence throughout this process.
Remove the magazine nut — at the front of the original magazine, or behind any extension — next. There are tools made for the chore, but a padded pair of channel locks will turn it just as well while protecting the finish. There’s a spring inside, so proceed with caution to prevent its unwanted launch.
Once that’s complete, you can remove the barrel. Set it aside, then use your finger to raise the shotshell elevator inside the receiver.
Now, holding the gun upright, grasp the installed forend and push toward the front gently. When it stops forward movement, depress the left-hand shell latch inside the receiver. It should come free without undue force, even on older guns. If not, make sure you’re applying pressure on the proper latch (there are two, one on either side of the receiver). The action bars and forend come out as a complete unit. The bolt assembly rides along. Note its orientation, then set it aside for now.
At the front of the forend is a magazine tube nut with two grooves 180 degrees apart. You can use a properly sized set of needle-nose pliers to loosen and remove it, but that can be a time-consuming and frustrating chore. There are wrenches designed for the task, and if this could be part of the services you offer, they’re worth the modest investment.
When the nut is removed, the forend slides off the action bar assembly. Replace it with the lighted model and ensure a flush fit at the front. Re-install the magazine nut, tighten fully and triple check, because it will be subject to a lot of pressure during use.
Now you’re ready to begin reassembly. Reversing the process will get it done, although there is one important additional step and a professional touch worth adding.
While it’s apart, clean, run an oil cloth over metal parts and lubricate. The fresh finished and smooth operation will remind the customer yours is the place for real customer care.
The only extra reassembly step comes after the bolt group is reseated properly and the action bars and forend go back onto the gun (again, orient the gun upright). As the action rods go into the receiver, they will hit a point at which they stop. Reach into the receiver, depress the right-side shell latch, apply pressure, and the assembly will move another quarter inch or so and stop again. Now depress the left-side latch and it will fully seat.
Reverse the remainder of the steps and reassembly is a breeze. Once complete, run the action a few times, remind the customer it needs to be function-tested, and point out the shotshells you have in stock.