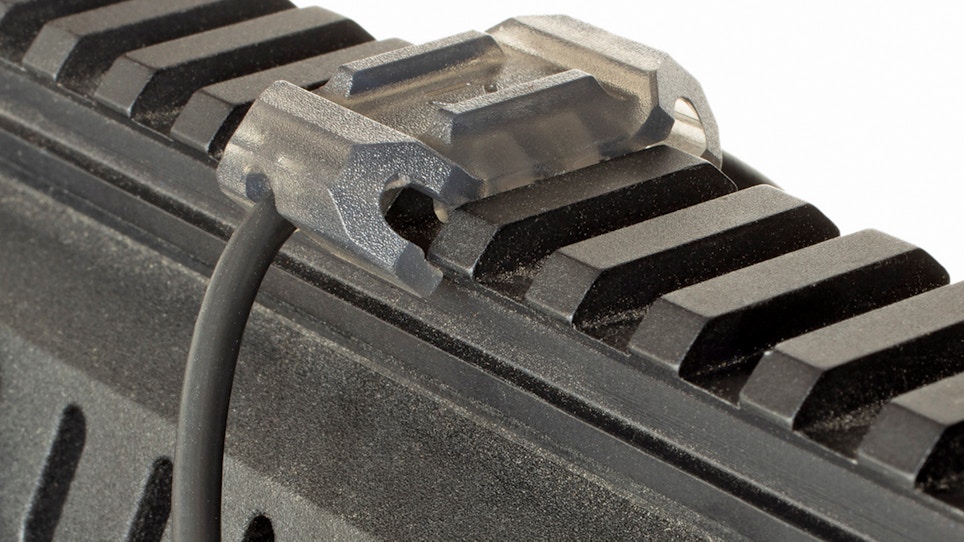
Whether it’s a laser, a weaponlight, an IR transmitter or a more exotic device, nearly all guns that wear electronics with a remote-activation pressure pad have one thing in common — wire, sometimes way too much. Left unmanaged, it’s not exactly high-speed, low-drag. When an untamed cable hangs up on an innocent-looking object, like a doorknob at night while ushering the family into a safe room, home-invasion response stalls.
Even if that modern sporting rifle or self-defense shotgun is used exclusively at the range or for competition, needlessly exposed wiring doesn’t survive firing-line abuse like metal or modern polymer. Chronic movement in unanchored cable can also fatigue the modest-gauge wire within, ultimately resulting in a hidden and tough-to-remedy short. That makes the small investment in cable management a wise decision, especially when weighed against the price of a good pressure pad and wiring.
Odds are good you have several solutions in stock, running from Picatinny rail covers to M-LOK-mounted guides. All are inexpensive and worth a mention whenever a customer buys (or owns) a remotely wired pressure pad. Explain the advantages and offer installation at the counter. Even if they decline, the customer understands your store’s staff readily shares its expertise, which goes a long way in bringing them back.
If they do accept the offer, start with a casual conversation on the virtues of those models you have in inventory. Most have exterior texturing to preserve grip with sweaty hands or in inclement weather. Some are translucent, more of an aesthetic preference. Others are angled to ensure flush and flat fit across challenging firearm profiles.
The location of that remote switch varies by gun owner and is a completely different subject — more like challenge. For this quick countertop service, we’re assuming it’s installed on a customer’s gun or riding on a new one going out the door.
It goes without saying that the nearly 10 million people who purchased their first firearm in the past two years place added emphasis on safety. Underscoring it at the counter adds layers of comfort for those new enthusiasts. Demonstrating that dedication will be a big part of where they shop.
With that in mind, keep the gun pointed in a safe direction and engage the safety. Drop the magazine and place it away from your immediate work area.
Work the charging handle and visually inspect that no cartridge remains in the chamber. Use a flashlight if it’s hard to see inside. Double check and maintain safe direction of the firearm while doing so.
Open the cable-management system package selected by the customer. Inventory parts and consult instructions as necessary. Factories do lose count from time to time.
Carefully inspect the interior, or mounting surfaces, on the new units. Fit needs to be flush and secure where they grip the rail or M-LOK. Burrs happen, dust collects and imperfections mysteriously appear. Avoid what can become a time-consuming headache by investing a few seconds now to look and clean if necessary.
Remove the cable from the electronic unit, usually accomplished by unscrewing the tailcap to access the batteries. Now’s a great time to ask the owner if they need replacing, by the way.
Gently release the tailcap and cable, allowing them to dangle and spin freely. This step releases tension or twists introduced during previous mounting, reducing stress on internal wiring.
Now loosely route the cable around the gun in the preferred fashion. Secure the tailcap and wire to the unit.
The cable-management anchor directly after the electronics is critical. Sufficient slack allows battery replacement, when necessary, but maintaining enough control minimizes unwanted movement and loop size. This location is the primary suspect when pressure pad wiring mysteriously goes bad.
Find a suitable location near or above there and, if necessary, clean the rail/M-LOK location. Affix the cable with the management unit and ensure battery replacement is effortless.
Run and anchor the rest of the cabling — working from the electronic unit to pressure pad — in identical fashion. Ensure wire runs properly through Picatinny rail lugs and M-LOK systems.
Bear in mind those big loops need to hold tightly to the gun wherever possible, but access to fire controls and accessories can not be compromised. Snug and adjust as you go to streamline the system, and never underestimate the importance of cleaning as you go. Once the cable management system’s components are installed, any debris remaining underneath will, given enough time, harness recoil’s energy to grind into the cable’s insulation.


