Concealed-carry pistols are a hot seller, along with matching holsters, self-defense cartridges and courses. The list of models, manufacturers and styles is long, but the demand for 1911 heavy metal never seems to fade. Odds are good a significant percentage of your customers own at least one or are always interested in seeing the latest models.
Having a solid selection of accessories and related gear on hand for “slabsides” is good for the bottom line, but there’s also an inexpensive upgrade worth mentioning at the counter. It installs fast, it is usually effortless and inexpensive, and it underscores your store’s dedication to customer service. A few in inventory covers dozens of models, thanks to the relatively standardized dimensions of 1911s compared to the dozens of polymer pistol shapes and sizes.
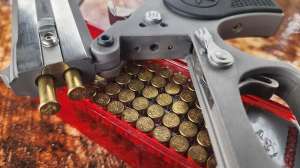
Beveled magazine wells gained traction in competitive shooting events, where slow reloads surrender time and cost matches. The approach is simple enough — increase the size of the magazine well and add angular transitions to help guide a fresh load in faster, even if initial entry angle is slightly askew. It’s efficient, proven in the hands of the pros, and a solid advantage for carry and home defense. Veteran gun owners won’t need an explanation, and a demonstration is enough to convince even first-time buyers.
Many quality and custom 1911s come with them, although not all do. A simple reminder at the cash register that they are available, along with expressing the willingness to handle the quick installation, goes a long way in building customer loyalty.
Keep in mind, however, quality versions from trusted manufacturers will not go on all 1911s. Many won’t mount on a version with a lanyard loop, for example. Grips also come into play, although anytime that problem is encountered, a few careful passes with a fine file provide a flush, nicely finished mount.
The steps are simple. As always, safety comes first. Ensure the pistol’s safety is engaged, drop the magazine and remove it and any ammunition from your immediate work area.
Keep the pistol pointed in a safe direction, rack the slide and lock it open. Inspect the chamber to ensure it is empty and remove any cartridge remaining. If you’re working in a dim area of the store, use a flashlight just to make sure nothing is chambered. Leaving the slide locked open during this process adds another layer of safety — just keep your fingers out of that chamber in case things slip.
Open the beveled magazine well, consult the instructions and inventory parts. There’s usually only one component, but now’s the time to also check for cosmetic blemishes on exterior surfaces and even burrs on interior ones that might endanger the gun’s finish during this process.
Pay particular attention to the surfaces of the unit that will slide against and grip the pistol’s frame. Rough spots or dirt there will cause scratches during installation. Clean if necessary. Run a cotton swab across interior faces, too. Unseen burrs will grab strands of fiber, making their location obvious.
Many companies apply a finish to the bolts that affix their grips. For that reason, select the right tool, whether screwdriver, hex head or Allen wrench, before loosening the grips to remove them. The right width and diameter minimize risk of scratching or marring that special look.
After removing the grips, give the now-vacant section of handgun frame a cleaning. Even factory-fresh firearms collect dirt when serial numbers are double checked after arrival or when customers take a closer look. To ensure nothing remains that could jeopardize the pistol’s finish during this installation, also clean the interior side of the grips.
Now you’re ready to carefully slide the new magazine well onto the gun. A little oil isn’t a bad idea, and be sure it’s oriented in the right direction — per manufacturer instructions — before starting.
Replace the grips, then tighten fully. Take a close look fore, aft, above and below to ensure they meet the frame solidly with no gaps — the sides at the bottom being the primary suspects. If they are up slightly from the frame, simply remove the grips and use a fine file to gently and carefully remove small amounts of their material. The gripping surface of the magazine well isn’t thick at all in the interior, so a few passes is usually all it takes for a flush fit. Continue the process, if necessary at all, until you’ve attained that factory custom look.
Once done, check there are no cartridges in the chamber, release the slide, and function check with an empty magazine. If it’s done right, yet another happy customer will soon be telling his friends all about your store’s value-added customer service.