AR owners have more choices now than ever before in what rides the business end of their barrel. Flash hiders and muzzle brakes are the most common, but suppressors and thread protectors — to minimize damage when the “can” is left at home — are gaining ground quickly.
Customers are tired of taking home a new gun with a generic and tired-looking birdcage at the end. Add the many bolt-action rifles shipping with threaded barrels today, and this added service can help your bottom line. But before you jump into the deep end, tossing on a preferred muzzle device can uncover some potentially profit-robbing pitfalls.
Some ARs, particularly pre-ban versions, can have their muzzle device permanently welded or pinned to the barrel. Look before you start, and if this is the case, installation/removal will require a qualified gunsmith (if it’s even possible). The purchase of a new barrel might be a more economical alternative in this case.
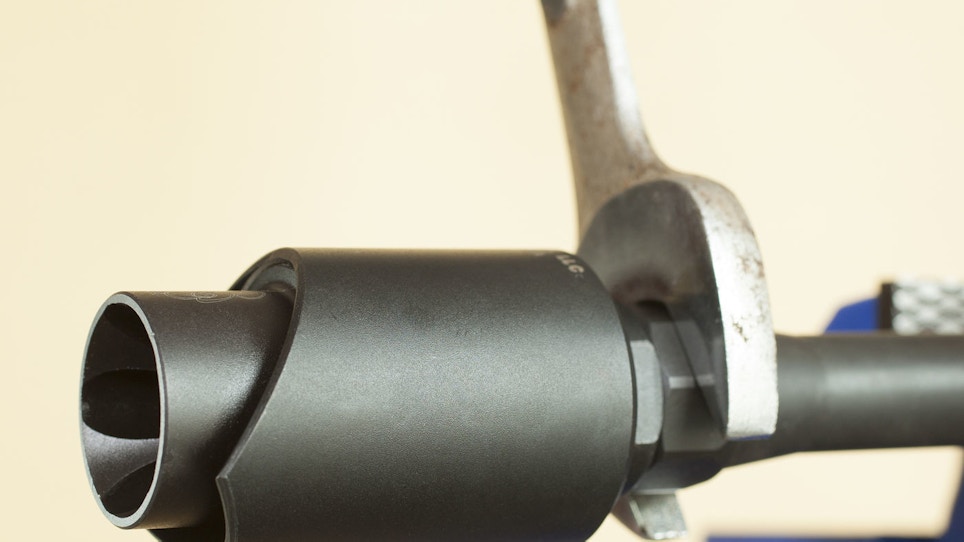
Muzzle devices can also be stingy when it comes to being removed and require a lot of torque to loosen — a particular concern on modern sporting rifles. In the process, the barrel can twist, crimping and bending the gas tube and even damaging the upper. To avoid the profit-robbing problems, the gun should be field stripped and the barrel firmly anchored. The “shade tree” gunsmith’s approach of two blocks of wood vised against the barrel to prevent marring the finish works in most cases. However, if the upper/barrel turns even slightly, it’s time to stop and employ one of the devices designed to make the task risk-free. Rust and grime may be the culprit, so apply some Kroil or another cleanser/lubricant before starting.
As always, drop the magazine and double check that the gun is unloaded. Apply a small amount of lubricant/cleaner at the back of the stock muzzle device, then push out the rear takedown pin on the lower receiver. Rotate the upper up and remove the charging handle and bolt carrier group.
Next, remove the last pin holding the receivers together and separate them. Place the barrel in an anchored vise between two pieces of wood or another non-marring surface. Make sure you leave enough room near the muzzle to work a wrench. Free the area near the upper receiver from any obstructions just in case it starts to rotate during this operation.
Don’t pound or apply any sort of jerking pressure during this process. Go slowly, and carefully watch to ensure the barrel and attached upper are not turning as you apply force. If you adjust vise pressure and it continues to move, it’s time to stop and procure/use one of the many tools available commercially that can ensure no damage is done during removal.
At the muzzle device, determine if it’s affixed by a crush washer or lock nut. If it’s the latter, use the proper-sized wrench and turn the nut clockwise until it disengages from the device’s rear face. The muzzle device can now be turned counter-clockwise for removal, usually by hand. Then do the same with the locking nut.
In a crush washer-anchored system, simply turn counter-clockwise (with the proper wrench size) with firm pressure until it finally budges and comes off. Once the muzzle device and nut/washer are removed, inspect the barrel threads and clean as needed. Consult the manufacturer’s recommendations for specifications on tightening and whether a locking compound is recommended.
Thread on the new locking nut with a clockwise motion until there is no more travel possible. Don’t tighten with a wrench yet, but hand-tighten until it stops. Do the same with the new muzzle device until it’s firmly against the nut. Back it out in a counterclockwise motion until the portion of the unit designed to be up is aligned. This needs to be less than one full turn.
With the proper wrench, turn the lock nut counterclockwise until it meets the muzzle device again. Hand tighten according to the manufacturer’s recommendation, and it’s on.
Ensure the skyward portion of the new unit is still timed (oriented) properly. Clean up all those unsightly fingerprints and reassemble the AR. Before replacing the bolt carrier group and charging handle, look down the barrel to ensure the line of sight is clear and there are no obstructions.
The final test should be at the firing line to make sure everything is working properly. If it passes with flying colors, present the gun and old muzzle device to the customer. With any luck, he or she will be at the range soon, telling friends where to score the new look and recommending your shop.


